Let’s find the solutions for the error “The device is not ready.”
How to solve ‘The device is not ready’ on your Windows PC?
Method 1: Inspecting Connection and Hardware
It is the most common cause and firstly going for this step is a wise decision because if the problem in hardware, then you can’t do anything by tweaking the software settings.
You should inspect the SATA cable for any breaks or sign of any defect.
Method 2: Running a Disk Scan Check in your PC

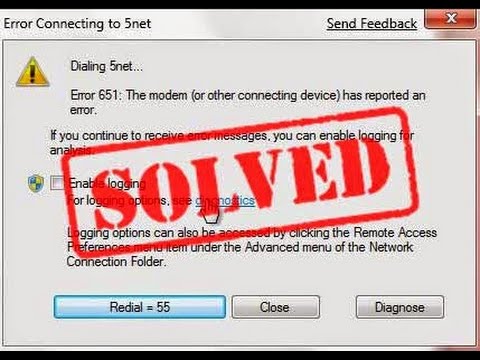
Error Code 651 is one of the most common error codes that you might face on your Windows computer while trying to access the internet.
This generally shows up when you connect the internet via PPPoE connection or Point to Point Protocol over Ethernet.
This connection helps people to use several PCs on a single Ethernet local connection.
Here’s how to fix 651 error code on Windows 10, 7, 8, Vista, and XP.Method 1: Restart the Computer and Internet Modem If your computer is affected by a technical issue or a program, then a restart might fix the problem.
Here are some instructions that might help you in fixing the problem:Shut Down the PC, but before doing this, make sure the work which is currently opened is saved safely.Turn off the Wi-Fi router or modem and then wait for five minutes.Plug the Modem or router back again.If that doesn’t fix the issue, then this time unplug every cabled attached to the modem and PC.Wait for a minute and then plug in everything back to their own place.Now Switch on the PC and see if the error code is resolved or not.Method 2: Update the Network Drivers of Your ComputerIf your computer’s network drivers are outdated or corrupted, then you will have to update or reinstall them.
You can update your network adapter drivers by accessing the Device Manager or Windows Update.
Fortunately, a Windows computer doesn’t get slow with time.
If your computer did slow down, then there can be some reasons behind it.
In this blog, we will go through the various solutions to speed up your Windows PC.
Let’s get started.Source : http://macfeemcafee.com/how-to-speed-up-a-slow-windows-78-or-10-pc-for-free/

The majority of global systems require a functional internet connection to work correctly.
However, a faulty internet connection can create multiple errors on your PC like, connection failed with error 651.
If you are facing the same, then the blog would be of great use to you.
So, here are the steps to fix the error.Source:-How to Fix Connection Failed with Error 651 on Windows?Attempt an Another ConnectionThe error may occur due to a malfunctioning internet connection.
Therefore, attempt a connection to a different internet connection, if possible.
In case it does not apply, the issue is with the system; in case it works, then the connection automatically is the culprit.Reboot the System and ModemIn case you intend to reboot the system and modem, then you can opt to follow the below-mentioned guidelines.First of all, turn off the system.Thereafter, switch off the modem and detach the connections from the AC power.You should detach the cord that is connecting the modem and system.Then wait for 30 seconds and attach the cords among the system and modem.You have to attach the modem of the source of power and switch on again.Now, turn on the system and attempt associating to broadband now and look if you are getting ‘error code 651 connection failed.’Reset TCP/IP to Solve Connection Failed with Error 651 in WindowsIf the users are trying to reset TCP/IP to solve connection failed with error 651 in Windows, then they should carefully apply the given steps.Navigate to the Start Menu on your system.After that, input ‘cmd’ into it and hit the Enter key.You will see a Command Prompt on your screen.During the Command Prompt, input the ‘netshintip reset reset.log’ command.Now, reboot the system and look at whether the problem is solved.Modify the Dial-up ConnectionIn case you intend to modify the dial-up connection, then you can opt to follow the below-mentioned guidelines.Go to the Start menu on your system.After that, input control panel’ into the search section to launch the Control Panel.Navigate to the Network and Internet tab.Select the ‘Network & Sharing Center’ option.Click on the ‘Change Adapter Settings.’Reach the ‘dial-up connection,’ and right-click on it, then choose the Create copy option.Finally, you should make a fresh connection, remove the prior one, and begin the fresh connection to look at whether the 651 error has solved.Turn off IPv6 to Solve Connection Failed with Error 651 on WindowsIf the users are trying to turn off IPv6 to solve connection failed with error 651 on Windows, then they should carefully apply the given steps.Navigate to the Start Menu on the system.Thereafter, input ‘control panel’ into it and hit the Enter key.You should click on the ‘Network and Internet’ option.Go to the ‘Network and Sharing Center’ and then select the Change Adapter Settings.Reach the active internet connection and right-click on it, then continue with the Properties option.Finally, choose the ‘Networking’ section and untick the ‘Ipv6 connection’ option.Turn off Auto-tuning for WindowsIn case you intend to turn off auto-tuning for Windows, then you can opt to follow the below-mentioned guidelines.Reach the Start menu and input ‘cmd’ into it then hit the Enter key.After opening the Command Prompt and input the command: ‘Netsh interface TCP set global autotuning=disabled.’Finally, attempt to link to the internet and check if you are getting 651 error.Clean Boot Option to Solve Connection Failed with Error 651 on WindowsIf the users are trying to clean the boot option to solve connection failed with error 651 on Windows, then they should carefully apply the given steps.Hold the Win + R keys at the same time on your system to launch the Run section.After that, input ‘msconfig’ into it and hit the Enter key.Go to the next section and reach the General tab then choose the ‘Selective startup.’Select the ‘Load startup’ items.Then move to the Service section and tick the box of “Hide all Microsoft Services.”Select the ‘Disable all’ option and turn off all other services.Now, reboot the system to finish the clean boot.Finally, link to the internet and look at whether the problem is fix.Install Network Adapter AgainIn case you intend to install a network adapter again, then you can opt to follow the below-mentioned guidelines.Press the Win + R keys at the same on your system to launch the Run section.After that, input ‘devmgmt.msc’ into it and hit the Enter key.You should select the ‘Network Adapters’ and spread it out.Then find the adapter and right-click on it then choose the Uninstall option.Now, rebooting the system will restore the network adapter and link to the internet and look at whether the error still continues.Replace the System FileIf the users are trying to replace the system file, then they should carefully apply the given steps.The “Raspppse.sys” system file location on Windows 7 is ‘C:\Windows\System32\Drivers.’Then change the name of the file as “Raspppse1.sys”.You should download the file of “Raspppse1.sys” from the internet and copy it in the over-mentioned location.Reach the folder and unzip it then install the file.Now, restart the system and check whether the error has been resolved.Launch Network TroubleshooterIn case you intend to launch the network troubleshooter, then you can opt to follow the below-mentioned guidelines.Navigate to the Start menu on your system.After that, input the’ control panel’ into it and hit the Enter key to launch the launch of the Control panel.Go to the search section and input ‘troubleshoot’ into it then press the Enter key.Choose the Troubleshooting option.Click on the ‘View All’ option on the left of the window.
While updating your Windows 10 operating system to the latest version, you might face certain issues such as Windows update cannot check for current updates.
This error occurs on your device because of several reasons.
In this article, we will show you how you can fix this issue on your device with easy steps.Edit RegistryHere are the steps on how to edit the registry:Tap Windows+ R hotkey on your keyboard and in the search tab type “Regedit” and then tap “Enter button or tap “OK.”When the registry editor launches, move to the command “Computer\HKEY_LOCAL_MACHINE\SOFTWARE\Microsoft\Windows\CurrentVersion\WindowsUpdate\Auto Update in the left pane.”Right-tap on “Auto-update” and then select “Export” in the dropdown menu.Here you can enter your desired name for File, select save location, and then tap on “Save” option.In this situation, if anything goes incorrect while modification, then you need to run this File to restore it.Here you need to enable the “Auto Updates” button that appears in the left pane, here you need to search for the “Reboot required” button.If it is available “Reboot required” then right-tap on it and then select “Delete” in the dropdown menu.Now tap “Yes” on the configuration dialogues that appear on your screen.Make Sure Time and Date CorrectIf you are receiving Windows updates cannot check current updates, notification on your device while updating Windows10.
Might be this issue occurs due to your incorrect time and date or problem with date and time on your operating system.Here are the steps on how to check time and date correct on your device:Right-tap on the clock symbol on your “Taskbar” and then select the “Adjust time and date” button on the dropdown menu.Now find the “set time automatically” button and disable this feature.
Now wait for a couple of minutes and then turn on features again.After the above process, you need to reboot your operating system and then try to update your Windows or check for improvement.Necessary Service Running On Your DeviceHere are the steps on how to check necessary service running on your device:Click Windows+ R key on your keyboard and then type “service.msc” in the search tab and then tap”Enter “ button on your keyboard or tap “OK.”In the service windows, find “background intelligent transfer service” and the double-tap on it to view Properties.Set Automatic from “startup type” and then tap “Apply” and hit “OK” to save your changes.Double-tap on “Windows Updates” and then change to startup type from automatic.After the above process, you need to start Windows service and “Back intelligent Transfer” service.Delete Windows Corrupted FileHere are the steps on how to delete Windows corrupted File:Launch the File Explorer and move to “C:\Windows\SoftwareDistribution\DataStore\Logs” directory.Fine “edb.log” files and then delete or rename it.Here are the steps on how to delete or rename files:Click Windows + I hotkey to launch the settings application.In the settings option tap on “Updates and security.”Click “Recovery” features in the right hand and then tap on “Restart now” option.Here you can view a list where you need to select Troubleshoot, hit advanced option and then hit Startup settings.Now you need to click on the “Restart” option.Here you will see a list appear on your screen with several options.
Tap on the safe mode version that you wish to use by tapping on the appropriate buttons.Reset Windows Updates ToolsHere are the steps on how to reset Window updates tools:Tap Windows and x key to launch a command prompt as administrator.

Updating windows is one of the vital things required in the system.
It helps our system by providing the latest features; fix the bugs as well as security patches.
However, while performing the update in Windows 10, the user may find that things are not working correctly.
The error code 0x8007007e has been encountered by numerous people while upgrading the system.
Some of them are:Interference of third party applications like antivirus.Corrupt registrySoftware conflictCorrupted system filesYou will get a message on your screen “Failed to install the update” or “Windows has encountered an unknown error” due to these reasons.Five Methods to Fix the Error Code 0x8007007eTo overcome Windows error code 0x8007007e, you can try the following effective methods:1.
Disable Third-Party Antivirus and Windows Firewall:Go to the windows Cortana search box.Type Control Panel and tap on the best match.Afterward, choose the System and Security.Then go to the Windows Defender Firewall (Windows Firewall.
This “Windows or Computer Heath is Critical” Error occurs when a virus or corrupted program or harmful software attacks your device or making modifications to your system.This error message is a virus or malicious message alert that can affect your personal data, including your passcode, debit, and credit card information and also your browsing history.
These alert messages inform you about the existing risk to your system and your private files.About “Computer Health is Critical” ErrorIf you are among those users who face this error code, then it is recommended to follow some of these troubleshooting steps to remove from your system as it may affect your device and data both.
It might be some corrupted ad-supported software or tools that are damaging your device.
Follow these instructions to resolve this error issues:Force Shutting Virus-Infected Program through “Task Manager”Firstly, you have to navigate to the “Taskbar” and apply right-click on it.
It is located at the lowermost portion of your window.After that, the context menu will appear on your screen.
As an alternative method, you can press simultaneously “Ctrl + Shift + Esc” from your keyboard to launch the app “Task Manager.”In case the malicious tool restricts you from entering standard utilities of Windows, then the task Manager could be launched by pressing “Alt + Ctrl + Del” keys.