Abigail Smith


Today, there are a number of devices coming with advanced and high-resolution webcams such as Desktop, Laptops, Notebooks, etc. and these Webcams are used especially for video calling. Today, most of the jobs and tasks become online, and thus the use of Videoconferencing with Office clients, etc. becomes very popular. Users may buy an independent webcam for their device, but the first job is to test the resolution and frame rates of these cameras if you are running Windows 10.
Several things should be noted just prior to using these cameras such as connection with your Bluetooth or USB Cable if you own an independent webcam for your device. The second thing is to note and check using the latest drivers for your device.
Sources :- Test and Use your Webcam on Windows 10 , Blog-antivirus
Here is how to check the camera of your device running on Windows 10:
Sources :- Test and Use your Webcam on Windows 10 , Blog-antivirus
Here is how to check the camera of your device running on Windows 10:
Checking Webcam Connection
- In the beginning, you have to ensure that your Webcam is perfectly connected with the device that you are using. Today laptops and Notebooks are coming with built-in cameras, and if you are using such built-ins, then you need not check for any external connection for video calling.
- In case of external or independent Webcam, you should take care and note these things carefully:
- First of all, check that the Webcam is appropriately connected to your system using the desired connection equipment or sources such as Bluetooth or USB cable. If you are connecting a Webcam with a USB cord, then you have to make sure that you are connected to a compatible and perfect connection slot.
- Once the connection is successfully made, then navigate to the next step to install the recent driver.
Installing Latest Driver for Webcam
Windows 10 provides a feature to install the compatible driver automatically once you connect your device to Webcam. In case you found that the driver is appropriate and up to date, then several issues may arise on your device. In this case, you should follow these guidelines to install the recent one:
- First of all, you have to launch the Run box via tapping the respective Windows logo and “R” key simultaneously.
- Now type “devmgmt.msc” into the search panel and then hit the OK tab to continue.
- Once the Device Manager launches on the screen, you have to search for the Cameras option and then open it.
- Now, apply right click on the camera option that you are using and then hit the “Update Driver” tab.
- After that, press the Update Driver Automatically option located at the prompt wizard on your screen.
- Now, wait silently and keep patience until the system scans for any available driver, and then it downloads the relevant one automatically.
- If you go an alternative way, then it is recommended to reach the site of your camera maker and then search for the respective camera edition and build number accordingly. Then, follow the procedures to download the recent drivers for your Webcam.
- Once you have completed all the relevant options, then you have to complete all the procedures manually.
Testing Camera on Windows 10
Once you have successfully abided by all the above instructions, then you have to test your Webcam on Windows 10. There are various ways to check it via conducting online tests.
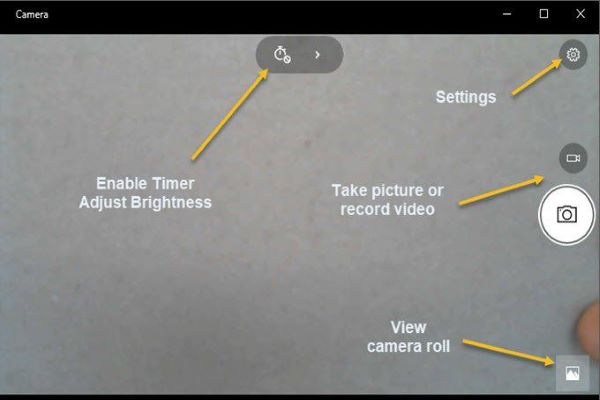
Using the Camera App
Using the Camera App
- First of all, you have to hit the Start menu and then scroll your page downward and move to the “C” section.
- Then, search and choose the option “Camera.”
- In case you are launching the camera section first time, then the app may take your confirmation before prompting another process. Give permission accordingly.
- Now, you have to be ready for the pose and then tap the camera icon located at the right-hand side section to capture the respective shot.
- In case you want to check your Webcam for the video calling process, then hit the arrow tab located at the uppermost right-hand side section of your app. When the video mode gets ON, then hit the Camera icon there and then begin video recording.
- You will get all your images under the section of Camera Roll located inside the Picture option.
Note: there are other two options to check your camera; you can apply these two also on your device accordingly:
- Taking an online test.
- Through Skype Video Calling.
Abigail Smith is an inventive person who has been doing intensive research in particular topics and writing blogs and articles on Blog-antivirus and many other related topics. He is a very knowledgeable person with lots of experience.

0
Abigail Smith
Related Articles

However, you need to use recorders to capture the screen.
Some tools support multiple screens, which means you can record your screen and webcam at the same time.
If you have a speaker, you can also record voice-over.
So, the answer is you can record the screen on a PC.https://wethegeek.com/11-best-free-screen-recorder-software-for-windows-2017/#screen #recorder #voice #pc #webcam #software #speaker
0

Of all the options available, the Windows 10 Enterprise product key lifetime and its key features are an effective option with unparalleled features designed to meet the needs of organizations of all kinds. We explore the meaning of a Windows 10 Enterprise product key with lifetime validity. Why Windows 10 Enterprise? Instead of exploring the specifics of validating a product key, let us examine the reasons behind the popularity of Windows 10 Enterprise among businesses. In addition, there can be further requirements for particular Windows 10 Enterprise features or apps.
0

Are you interested in knowing what you can do to update Windows 10 Home to Pro without any issues? If you’re trying discover how to upgrade Windows 10 home to pro it is necessary to determine which version of Windows it’s. It is recommended that the windows 10 Product Key of Home on the Control Panel sheet must be modified to successfully upgrade Windows 10 Home to Pro. After that you can begin the steps to upgrade Windows 10 Pro effortlessly. Make the upgrade from Windows 10 Home to Pro by manually installing the updates like we explained earlier.
0

The popular Windows 10 Pro Product Key has an enhanced edition called Windows 10 Pro, which is more powerful and designed to satisfy the needs of power users and modern businesses. Microsoft created Windows 10 Pro, a Windows 10 operating system version. Feature of Windows 10 Pro:BitLocker:A whole disk encryption feature included with Windows 10 Pro, adds an extra degree of security to your device by preventing unwanted access to data stored on it. For companies with straightforward IT requirements, Windows 10 Pro offers everything needed to run an efficient and secure operation. On the other hand, Windows 10 Enterprise Product Key caters to the needs of large corporations and enterprises with complex IT ecosystems.
0

Understanding the Product Key for Windows 10 Pro:A product key for Windows 10 Pro is a 25-character code that is proof of purchase and is required to activate the operating system. When purchasing Windows 10 Pro, whether as a standalone product or as part of a device package, the product key of Windows 10 Pro is provided to the user, typically via a sticker on the device or through an email for digital purchases. Unlike the Windows 10 Home operating system, which is suitable for everyday home use, Windows 10 Pro is designed for more advanced needs. With a valid product key for Windows 10 Pro, users can fully activate these capabilities and use a restricted operating system version. Furthermore, a valid pro product key Windows 10 ensures compatibility with various software and hardware.
0

This is considered to be the most popular option available in the industry because of the effectiveness as well as safety element provided by it. Hence, in this particular manner, everything will be free as well as completely safe which is the main reason that people can indulge in the activation process very easily. The best part of depending on this particular option is that there will be no need for any kind of technical requirement or knowledge in the whole process and even kids can go with the option of activating Windows 10 with the utilisation of the Windows 10 activator TXT. Following are the basic things which people need to know about this concept:First of all, people need to be clear about clicking on the official link of the Windows 10 activator TXT and as soon as clicking will be carried out people will be able to open the file without any kind of doubt. Implementation of this particular thing is a good idea because it is very much compatible with different other versions of Windows for example Windows 10 activator txt, Windows 10 pro and the biggest other kinds of options.
0