


Backing up your iPhone is as important as the smartphone itself. In case your iPhone gets damaged and you need your data, a backup can save the day.


Have you installed VLC and you need videos to watch on your iPhone? Well, you would have to use iTunes to do this. This is how you do it.

While shifting from one iPhone to another, you can use iCloud’s continuity.
If the new iPhone has been set up and is signed into iCloud using the same Apple ID as the older device, then there will be no loss while syncing with iCloud.

If you see that your iOS device is running very slowly, encountering network problems, performing slow operations, then you may fix it by recovering from the backup.
iPhone and iPad are fast performing devices, but sometimes they may work slowly because of the issue with your network or any other technical cause.
Here are the steps to restore your iOS devices from a backup.
Check for the size and its date to pick a relevant one.
If asked to provide your Apple ID & passcode to start the restoring process for your applications and Apple purchases, then enter it in the space provided.
In case you have created multiple IDs on various app purchases, you may skip the sign-in process.

Heard about ASO marketing? Wish to know what is the right method of ASO marketing and what will be its impact on your mobile app’s success? If so, then take no time to go through this blog shared by an expert from the top mobile app development company.
The reality of our device-rich world is that we will, at times, have a smartphone or tab that does not have the same operating system as the computer or laptop.
To make things worse, you may have pictures on your Mac that you want to move to your iPhone.
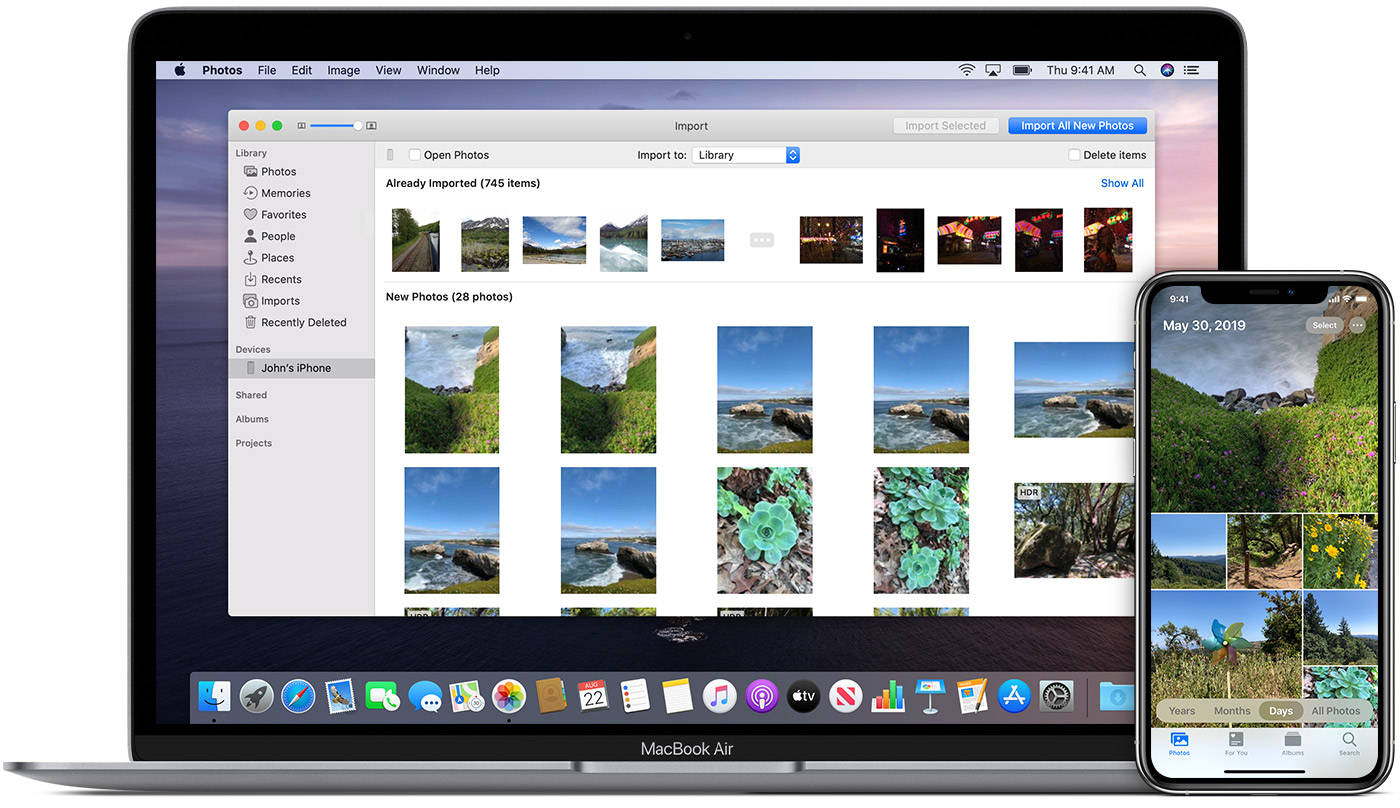
Read on and check out the best ways to transfer photos from your Mac device to iPhone.Using iCloud Photo LibraryFollow the stepwise instructions given below:Launch the application of Photos on your Mac.Then choose the Photos option in the upper left and pick the Preferences option.You should choose the iCloud section.Don’t forget to mark the box of iCloud Photos.Uploading the Photos from iCloud.comFollow the stepwise instructions given below:You have to ensure that you have enabled iCloud Photos on the iOS devices.Then go to ‘iCloud.com’ and log in using your Apple ID.You should choose the button for Photos.Once everything gets loaded, select the button of Upload.After that, click on the images option.Choose your preferred hard drive.
Using AirDrop to Move Images from MacBook to iPhoneYou can use AirDrop to move images from your MacBook to iPhone by following these steps provided below:Invoke the Finder on the Mac.Then launch a fresh Finder tab or screen so that you can see two Finder locations simultaneously.You should find and choose the videos and photos you would like to move to the iPad or iPhone.Once you reach the Finder tab or screen, select the ‘AirDrop’ option.Go to the iPad or iPhone, ensure that it’s awake and unlocked.Don’t forget to enable the ‘AirDrop receiving’ option on iPad or iPhone and tweak it to Everyone.Click on Accept, if prompted.Use Finder or iTunesHere are the steps you can follow:Connect the iPad or iPhone to the Mac.Open the Finder, in case it does not launch automatically.You should choose your iPhone or iPad.Choose the Photos section.Thereafter, mark the Sync Photos box.You have to choose the source of the pictures that you would like to sync.Select either of the following options: Sync Selected Folders or Sync All Folders.Pick the Folder you would like to sync from the ‘chosen source.’Later, tick the ‘Include videos’ box, in case you want.Now, tap on the Sync button.The reality of our device-rich world is that we will, at times, have a smartphone or tab that does not have the same operating system as the computer or laptop.
Read on and check out the best ways to transfer photos from your Mac device to iPhone.Using iCloud Photo LibraryFollow the stepwise instructions given below:Launch the application of Photos on your Mac.Then choose the Photos option in the upper left and pick the Preferences option.You should choose the iCloud section.Don’t forget to mark the box of iCloud Photos.Uploading the Photos from iCloud.comFollow the stepwise instructions given below:You have to ensure that you have enabled iCloud Photos on the iOS devices.Then go to ‘iCloud.com’ and log in using your Apple ID.You should choose the button for Photos.Once everything gets loaded, select the button of Upload.After that, click on the images option.Choose your preferred hard drive.Using AirDrop to Move Images from MacBook to iPhoneYou can use AirDrop to move images from your MacBook to iPhone by following these steps provided below:Invoke the Finder on the Mac.Then launch a fresh Finder tab or screen so that you can see two Finder locations simultaneously.You should find and choose the videos and photos you would like to move to the iPad or iPhone.Once you reach the Finder tab or screen, select the ‘AirDrop’ option.Go to the iPad or iPhone, ensure that it’s awake and unlocked.Don’t forget to enable the ‘AirDrop receiving’ option on iPad or iPhone and tweak it to Everyone.Click on Accept, if prompted.Use Finder or iTunesHere are the steps you can follow:Connect the iPad or iPhone to the Mac.Open the Finder, in case it does not launch automatically.You should choose your iPhone or iPad.Choose the Photos section.Thereafter, mark the Sync Photos box.You have to choose the source of the pictures that you would like to sync.Select either of the following options: Sync Selected Folders or Sync All Folders.Pick the Folder you would like to sync from the ‘chosen source.’Later, tick the ‘Include videos’ box, in case you want.Now, tap on the Sync button.
Source:- How to Move Photos from Mac to iPhone?


