Gain an Informative Advice To Contact Computer Tech Support in No Time
It could be a brilliant function to check out the cause of the common issues that you are confronting on your computer device. You could be a client, owner of a company, a personal or professional user, but it is tremendously unbleached to keep yourself away from your computer device. In case you are working to complete the office’s task at your home, but unfortunately your computer stops working at this, you are required to solve the issues promptly. So just believe it or not, as if you have god gifted spunk to solve such kind of issue at once, you will simply get to know the genuine cause of the issue to solve this bug at a certain time. On the contrary, if you are not aware of the technologies including hardware and software, you are required to contact a Computer Tech Support team that is available at every time to provide you a significant helps to solve each type of technical glitch on your computer device promptly.
If you are looking for help and other important information related to the computer device, you should contact a Computer Technical Support Services
The text above is a summary, you can read full article here


Printer Customer Support offers you the best solutions online in order to do a scan from Printer to computer Windows 10.
We have a team of online support experts, who guide you step by step configure your scan settings on your computer.

Issue: Computer Freezes when checking for Windows Update Getting Error code 8024400d when upgrading to Windows 8.1 from Windows 8.When you try to download or install updates from Windows Update in Windows 8, Windows 7, or Windows Vista, the computer may freeze.
If the computer freezes during installation
Solution for the error code 8024400d:
Run Windows Update Troubleshooter and check if it helps.
If you’re having problems installing Windows Updates, use the following method.
When you start your computer by using the Windows installation disc, you can perform system recovery options on startup.
If your Windows Defender causes up an error notification saying “item skip during the scan,” then the issue occurred due to an item being missed during the scan.
If you have disabled network scanning on your device, then you can also face this issue.
The application settings does not have the ability to control the scanning of your network settings.
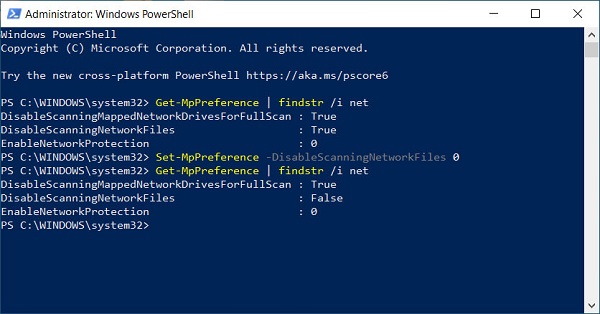
To fix this, you might be needed to enable networking scanning on Windows Defender.How to Enable Network Scanning in Windows DefenderIn this article we will show you how you can enable network scanning in windows defender with three ways and each method will permit network scanning:PowerShellGroup PolicyRegistry EditorAll these methods are depending on which windows version you are using, and you can select one from the above methods.1) PowerShellStart PowerShell along with the admin account.Enter and confirm the command:Set-MpPreference –DisableScanningNetworkFiles 0There is no other output for this command, so you need to copy a file from your network and check you fix this error.If you wish to disable it, then you need to set it 1.2) Group PolicyHere are the steps on how to enable Network scanning in Windows Defender through Group Policy:Launch the group policy editor and the visit to Computer configuration.Tap Administrative temples.Hit Windows components.Tap Windows Defender Antivirus.Tap Scan.Double-tap “Scan network files” and then set it to “Enabled.”Tap Ok.When you have enabled this service, all network files will be scan automatically.Remember that the default setting cannot scan any network files.3) Registry EditorWhen you are using Windows Home, you can also try to check registry value in the group policy that is not available for you.Here you need to launch registry editor and move to:Computer\HKEY_LOCAL_MACHINE\SOFTWARE\Policies\Microsoft\Windows DefenderRight-tap on “Windows Defender” and generate a folder key with the name “Scan” in the scan option.
Here you have to create a new DWORD with “DisableScanningNetworkFiles” and then set it to “0” to enable the scanning.Turn off the Registry.Next, you need to copy the file network; it will automatically scan.You can also copy the shortcut key and import it into another PC to apply rapidly.John Smith is a creative person who has been writing blogs and articles about cybersecurity.
He writes about the latest updates regarding mcafee.com/activate and how it can improve the work experience of users.
Windows Defender is the in-built antivirus and is fairly competent at its job.
However, there are times when the tool might flash an error on your screen.
Error 0x800704ec is one such error, and if you are encountering it too, then we will help you out.
So, here are the instructions to solve the error.Turn off the Windows Defender ServicesIn case you intend to turn off the Windows Defender services, then you can opt to follow the below-mentioned guidelines.Hold the Win + R keys at the same time on your system to launch the Run section.After that, input ‘service.msc’ into it and hit the Enter key.You should browse for the services for Windows Defender in the list of Services to look whether they are working.Go to the services that have an empty space into the column of Status.You have to the right click on them and choose the Start option.Now, restart the system.Turn off and Uninstall Third-Party Antivirus ProgramThis is not unusual for third-party antivirus utility to interrupt with Windows Defender, more often than not even stopping it from opening.
So, simply launch the list of installed programs section under Control panel and uninstall them.Change the Group PolicyIf the users are trying to change the group policy, then they should carefully apply the given steps.Hold the Win + R keys at the same time on your system to launch the Run section.Thereafter, input the ‘gpedit.msc’ and hit the Enter key to launch the Group Policy Editor.Go to the folder of ‘Administrative Templates’ and twice click on it, beneath the Computer Configuration.You should click on the Windows Components option.Navigate to the ‘Windows Defender Antivirus’ and locate the ‘Turn off Windows Defender Antivirus’ on the right-hand side of the screen.Reach the ‘Turn off Windows Defender Antivirus’ and twice click on it.Now, click on the ‘Not Configured’ option and select the Apply and OK buttons.Change Certain RegistriesIn case you intend to change certain registries, then you can opt to follow the below-mentioned guidelines.Press the Win + R keys at the same time on your system to launch the Run section.After that, insert the ‘Regedit’ and hit the Enter key to launch the Registry Editor.Navigate to the pursuing address and remove the ‘msseces.exe’ entry from both of them: ‘Computer\HKEY_LOCAL_MACHINE\SOFTWARE\Policies\Microsoft\Windows Defender.’You should locate the ‘REG-SZ’ on the right-hand side of the screen and twice click on it to adjust the value to 0.Now, restart the system.ConclusionThe blog represents the resolution of the Error 0x800704ec.
It is suggested to be aware while reading the article because the process is a bit intricate and lengthy.