


The Amazon Kindle is the future of books and people have widely accepted this transition from a hefty bookshelf to a more compact and portable one. No matter what model you use, Kindle is the best eBook reader. So, once you have this awesome device in hand the first thing you need to do is register yourself. Because registering your device will give you access to a plethora of books that the device offers.
For the users buying it from Amazon, your device will be pre-registered to your Amazon account. But if this is not the case, and your Kindle comes from a third-party source, then you will have to register the device manually to get access to the vast number of eBooks and other amazing content.
It is obvious to wonder that after buying why do you need to register your device in the first place? This is because to gain access to all magnificent features offered by Amazon. It is also recommended to register Kindle to Amazon before making any purchase for a hassle-free experience. Another advantage is that your Kindle will automatically sync with any updates that are available on the Amazon servers.
About Kindle
If you have recently bought the Amazon Kindle or you are planning to buy one then there are a few things that you should know about it. The main reason why Kindle gained popularity more than the other tablets in the market is that it is an eReader. Kindle restricts your internet surfing and is designed specifically for reading purposes only. So, if you are interested in minimal browsing and mostly diving into books, you do not have any better option than Kindle. It is a touch screen but attempts to give you the feeling of paper. The internet browsing restriction is liberated in some models though.
Beginning with Kindle Registration
To begin with, your basic requirement is an internet connection. In some models the device allows you to connect to Wi-fi during setup. If not, then follow the mentioned additional steps to set up a Wi-fi connection for Kindle registration.
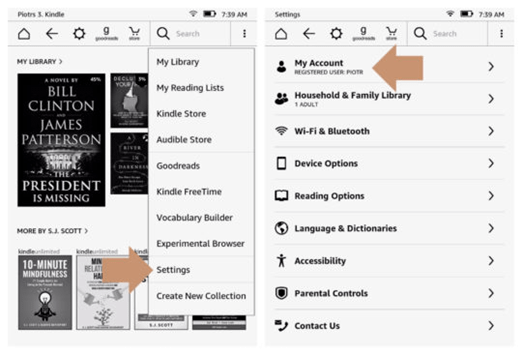
- Go to the upper right corner of the home screen.
- Tap on Menu
- Go to Settings
- Find Wi-Fi Networks
After this, you can connect to the internet using Wi-Fi.
If you have a Kindle Fire 3G then you can simply get started using your cellular data.
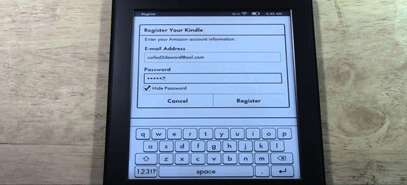
For registering your Kindle, you need an Amazon account. The existing users can
just log in with one tap. The new users can sign up using the following steps.
- Go for signing up
- Create a new account
- Choose your country or region
- Enter your details as username, email address
- Set a secure password
- Confirm the password
- Enter a billing or payment method (This will be used to make your Kindle eBook purchases)
- Continue Setup
Once you have set up your Amazon account, your Kindle will be ready for use. You will get the option to connect any social media platforms, linked to your email address, to your Kindle. On social media, you can connect with several other readers and people who have the same reading interests as you. If you have purchased a Kindle for your child, you should set up parental controls. The users can also connect to the GoodReads community, which is popular for its reader database.
Now you are all set to use your Amazon Kindle. Once the Kindle registration process is complete, there will be a small tutorial to help you out with the handling of your eBook reader. If you have purchased any eBooks from Amazon before your Kindle came in, they all will be made available on the home screen of your device.
Kindle Registration Using a Computer
In case if you neither have a Wi-fi connection nor cellular data, your computer can come to your rescue. Visit https://mykindlesupport.com/ and log in to your account.
- Go to Manage your Kindle
- There you will find an Amazon Kindle register link
- Access the link to head to your Kindle account
- There you will be asked to enter the key found in the Kindle Device information settings
- Once done, your Kindle device will be successfully registered to your Amazon account
What To Do After Kindle Registration?
After you have registered yourself and gone through the tutorials, you can begin with your reading journey. First, adjust the backlighting, learn to flip pages, find a dictionary, use the X-Ray function, and go through all the other features for easy and swift handling of the device.
The device will ask you to pick your favorite genres of books. The algorithm also makes you choose between some popular reads to configure presenting you with books of your liking. Kindle also prompts you to rate 10 books that you have already read to get an idea of your preferences. Towards the end, Kindle will offer you to download free samples of the books you wish to read. Do not miss out on the Kindle Unlimited free trial that is offered to new users!!
Free Books
Kindle will present you with a plethora of books—name a book and you will get it. But as we know everything comes with a cost. This saying might not hold for Kindle. As it has books that have been published centuries ago. The books that are published before 1925 are not subjected to copyright and are thus available for free. There are over 2 million such classics that will take you a lifetime to read.
Amazon Kindle Lending Library
It is practically not possible to buy every book on your reading list. Amazon understands this user dilemma and has hence opened a functionality called Amazon Kindle Lending Library. As the name suggests, you can borrow books. This feature is however available only for Amazon Prime members. They can borrow one book of their choice each month. The other users can borrow books from the public library, check if they are compatible with your Kindle, and download them.
This feature can also be used to lend you eBooks to your friends, even if they do not have a Kindle. The lending time is however restricted to a period of 14 days. But mind that just like a physical book, you cannot read the book when it is with your friend. However, the lending feature is currently not available for all books. So, if you don’t see the Loan this title option on the left side of the menu, your friend will have to make some other arrangements. On the contrary, once you have loaned your friend an eBook they will be notified via mail. This whole lending borrowing process can be done if both the parties are Amazon users.


Kindle Fire is a best invention of the Amazon which is used for e-reading purpose.
Here we are giving some guidance for How to update your kindle fire tablet.
Ways to update your kindle fire tabletCheck OS Version of kindle DeviceIf you want to update your kindle device then first you have to check which kindle fire OS version you have installed in your device.
To check OS version in kindle fire follow some simple step: First swipe down the screen from top to bottomTap setting buttonAfter tap on setting button go to device option then go to system updateAbove steps tells user kindle fire is running on which OS version.
To start this process make sure that Wi-Fi connection is properly working or not.Click on the “Quick Setting” optionAfter tap on the “Quick Setting” option then tap on “Sync” option.After performing above steps, software updating process will automatically start.Now you kindle fire is upgraded with latest version.
Copy the Software to Kindle DeviceOpen “Kindle Software Updates” pageChoose the specific kindle device you want to updateOn download page, click on the Download Software Update linkConnect your Kindle to your computer.After connecting kindle device to computer, a device icon shown.

Get the best advice on how to update Kindle, Then visit the Kindle Assists website with exciting offers for your Kindle devices.
We offer you the latest cybersecurity news, solutions, and best practices, you can browse the www.kindle.com/support link.

We provide the best Amazon Kindle support for any problem arising in any Kindle model.
We have a very dynamic support facility where different methods are used to provide assistance to the customers.
Call us to know more about our Kindle support.

We know all the tips and tricks that are required to fix issues in Kindle devices.
We request our users to get the right support by calling us on Amazon Kindle support.
Don’t wait, call us right now.
Kindle Fire Support | Kindle Tech Support .

If you are a true book-lover, you desire to read every kind of book based on your taste and preferences.
However, in this era of digital disruption, the trend of physical books is getting disappearing by every passing of minutes; as people are getting more indulge in E-reading.


